Quick Links
Introduction
In the fast-paced world of software development, good communication is crucial. Since we’re almost entirely remote and distributed across multiple time zones, the Microsoft TypeSpec team uses Microsoft Teams channels extensively for our interactions.
Much developer time is spent monitoring these channels and responding to questions from other teams, which takes time away from feature development.
One solution we’re experimenting with is harnessing the Microsoft Graph API to export Teams channel data for use in a Retrieval-Augmented Generation (RAG) enhanced chatbot.
This article describes how we’re doing it, and the relevant scripts described below are available on my GitHub repo.
Understanding the Microsoft Graph API
The Microsoft Graph API is a tool that allows developers to access and integrate data from various Microsoft services, such as Microsoft 365, Windows, and Enterprise Mobility + Security. Think of it as a bridge connecting different islands of data. With this tool, developers can create applications that can interact with these different data sources, reaching a large number of users and enhancing the features offered by Microsoft 365.
The API provides a single endpoint, https://graph.microsoft.com, for access to rich data and insights within the Microsoft cloud. It includes services that manage user and device identity, access, compliance, and security, offering robust protection against potential data breaches.
In this context, we’ll use the Microsoft Graph API to extract data from a Teams channel.
Identify Your Teams Channel
The extraction process is handled by a script that uses the Microsoft Graph API to fetch messages and their replies from a specific Teams channel.
The group id and channel id of the desired team and channel are required as parameters, which are specified as environment variables in a .env file.
Follow these steps to obtain the group id and channel id:
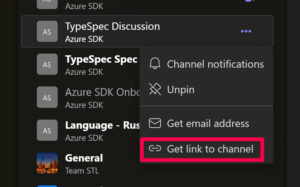
- Open Microsoft Teams and navigate to the desired channel.
- Click on the three-dot menu icon next to the channel name and select ‘Get link to channel’. This will copy the channel link to your clipboard.
- Paste the copied link into a text editor. The link will be in the format `https://teams.microsoft.com/l/channel/<channel_id>/<channel_name>?groupId=<group_id>&tenantId=<tenant_id>`.
- Extract the `group_id` and `channel_id` from the link.
Once these values are obtained, they should be added to the .env file in the same directory as the script. The .env file should contain the following lines, replacing `<group_id>` and `<channel_id>` with the actual values:
GROUP_ID=<group_id>
CHANNEL_ID=<channel_id>
Obtain a Graph API Access Token
To access Teams data via the Graph API, you’ll need to obtain a Graph API access token. Please note that you’ll only be able to extract data from Teams channels that you actively have access to.
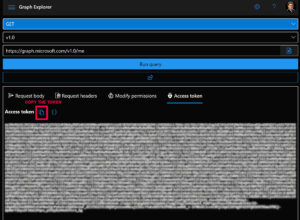
You can get an access token by logging into the Microsoft Graph Explorer at https://developer.microsoft.com/graph/graph-explorer and copying the access token from the access token tab.
It’s important to note that these tokens have a short lifespan, measured in hours, so be prepared to regenerate them often by reloading the Grapḣ Explorer UI.
Once the access token is obtained, users need to replace the values in the .env file with their actual ACCESS_TOKEN, GROUP_ID, and CHANNEL_ID, and save the .env file in the same directory as the script.
Query the Teams Channel Using the Graph API
It’s possible to query the Graph API using REST GET requests, but given the amount of information returned, it’s much more practical to do it using scripts.
I’ve written Python scripts for this purpose, which you can get from my GitHub repo.
The `channel_query.py` script fetches and formats messages and their replies from Microsoft Teams using the Microsoft Graph API. The script cleans the HTML content of the messages and formats them into a JSON structure.
To illustrate how the script fetches messages and their replies from a specific Teams channel using the Microsoft Graph API, consider the following code snippet:
# Get the messages and their replies
url = f'https://graph.microsoft.com/beta/teams/{group_id}/channels/{channel_id}/messages?$expand=replies'
headers = {'Authorization': 'Bearer ' + access_token}
This code constructs the URL for the API request and sets the necessary headers, including the authorization token.
Script Functionality
At the heart of the script’s functionality is a fetch of all messages and their replies from the specified channel and then a filter of the messages by date.
This two-step process is necessary because the Microsoft Graph API does not currently support the `createdDateTime` filter query parameter for the `/messages` endpoint. The date filter implemented in the script bypasses any messages that were created before the specified date.
The script formats the messages and their replies into a JSON structure, as shown in the following code snippet:
formatted_message = {
    "messageId": message['id'],
    "messageDateTime": message['createdDateTime'],
    "messageContent": message_content,
    "replies": [
        {
            "replyId": reply['id'],
            "replyDateTime": reply['createdDateTime'],
            "replyContent": (re.sub('<[^<]+?>', '', html.unescape(reply['body']['content'])) if reply['body']['content'] else '').replace('\u00a0', ' ')
        }
        for reply in message['replies']
    ]
}
This code creates a dictionary for each message, capturing the message ID, timestamp, content, and replies.
The script also cleans the HTML content of the messages. This process is illustrated in the following code snippet:
# Clean the HTML from the message content
message_content = html.unescape(message['body']['content']) if message['body']['content'] else ''
message_content = message_content.replace('\u00a0', ' ')

# Parse the message content as HTML
soup = BeautifulSoup(message_content, 'html.parser')

# For each  tag in the message content
for a_tag in soup.find_all('a'):
    # If the  tag has an href attribute
    if 'href' in a_tag.attrs:
        # Replace the  tag with its href attribute formatted as a Markdown link
        a_tag.replace_with(f"[{a_tag.text}]({a_tag['href']})")

# Convert the parsed HTML back to a string and remove all HTML tags
message_content = re.sub('<[^<]+?>', '', str(soup))
This code unescapes the HTML content, parses it, replaces any <a> tags with their href attributes formatted as Markdown links, and removes all remaining HTML tags.
Running the Script
The script is run with two command-line arguments: the name of the output file and the date from which to fetch messages.
python .\channel_query.py output_file_name.json <YYYY-MM-DD>
The script prints the formatted messages as JSON to the console and, if an output file name is provided, writes the output to the file.
Convert Channel Data to JSON
The second step in the process takes the JSON data file produced by the first script and extracts question-answer pairs using Azure OpenAI, creating a new JSON file for each pair.
questions = await generate_qna(message_content, question_prompt)
answers = await generate_qna(questions + '\n' + answer_content, answers_prompt)
This code sends the message content and a predefined prompt to the OpenAI API to generate questions. Then, it sends the generated questions and the replies to the same API to generate answers.
Script Functionality
The script’s core functionality is to extract question-answer pairs from the input JSON data, which was extracted from a Teams channel. It does this by sending requests to the OpenAI API to generate questions and answers based on the input data. The script then creates a new JSON file for each question-answer pair.
pair = {
    "Questions": question_list,
    "Answers": answer_list
}

# Create a new file for each pair
with open(os.path.join(output_dir, f'qna_{counter}.json'), 'w') as f:
    f.write(json.dumps(pair, indent=4))
The script is designed to handle potential issues such as request timeouts and rate limits. If a request times out, the script retries the request after a delay. If the rate limit is exceeded, the script waits for the specified delay period before retrying. If a valid response is not received after a certain number of attempts, the script skips the current chunk of data and moves on to the next one.
The script also includes functionality to check if a string is a valid JSON object. This is used to ensure that the responses from the OpenAI API are valid before they are processed further.
Once the question and answer pair are written to file, they look like this:
{
    "Question": {
        "Q0": "What is TypeSpec?"
    },
    "Answer": {
        "A0": "TypeSpec is a language used to describe cloud service APIs. It can generate other API description languages, client and service code, documentation, and other assets. It provides core language primitives that can describe API shapes common among REST, GraphQL, gRPC, and other protocols."
    }
}
Running the Script
The script accepts two command-line arguments: the path to the input JSON file and the path to the output directory where the question-answer pair files will be saved. The script requires the correct setup of a .env file and the installation of necessary Python libraries.
To run the script, users should execute the command `python convert_channel_data.py input.json output_dir` from the command line, replacing `input.json` and `output_dir` with the path to their input file and output directory, respectively.
Building the Chatbot Application
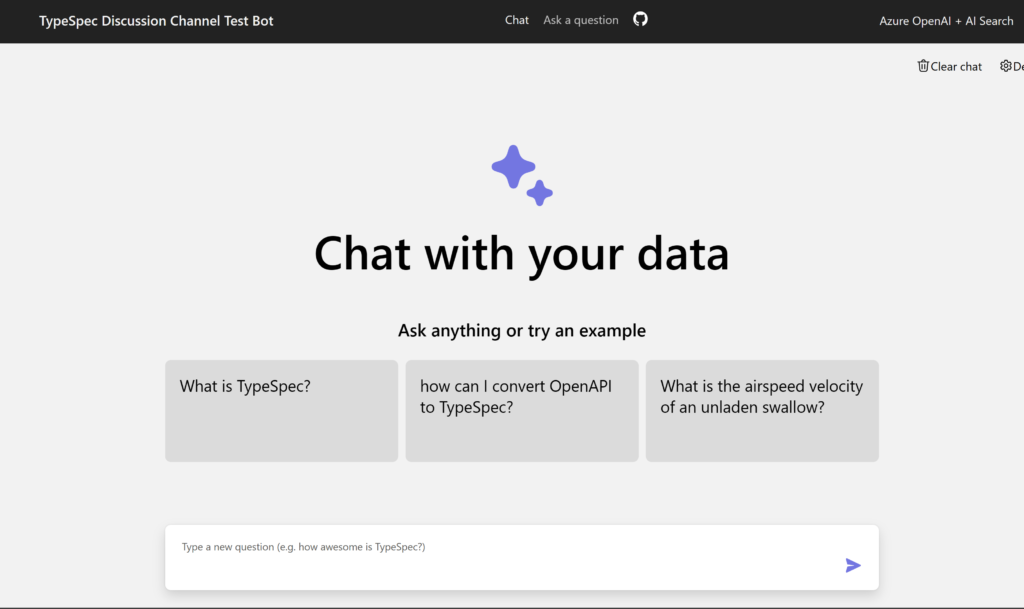
The final step in this process is to construct the chatbot application. For this, we utilize the “ChatGPT + Enterprise data with Azure OpenAI and AI Search” project provided by Microsoft and available on GitHub. This project employs Azure OpenAI Service and Azure AI Search to create a chatbot that can interact with your data.
The project comes with a default data set. For this use case, you’ll replace the files included in the ‘data’ folder with the question-answer pairs generated by the `convert_channel_data_json.py` or `convert_channel_data_markdown.py` scripts.
Here’s a brief guide to get you started:
- Clone the ChatGPT + Enterprise data with Azure OpenAI and AI Search repository.
- Replace the default data set with your generated question-answer pairs.
- Follow the instructions in the project’s README file to set up and deploy the application.
Remember, this project serves as a starting point.
For detailed instructions, refer to the README file in the GitHub repository.
Conclusion
So how well does the chatbot work? We’re still experimenting with it, but early tests show a lot of promise. The goal is to create a Teams channel app based on this chatbot that can automatically respond to user questions.
Moving from data extraction in Microsoft Teams channels to creating a Retrieval-Augmented Generation (RAG) enhanced chatbot demonstrates the practical benefits of combining different technologies. By leveraging the Microsoft Graph API, Python scripts, and Azure OpenAI, we can extract, format, and transform Teams channel data into a structured form suitable for a chatbot application.
The “ChatGPT + Enterprise data with Azure OpenAI and AI Search” project on GitHub serves as a robust foundation for this experiment. It allows for the customization of the chatbot with your own question-answer pairs, tailoring the application to fit specific needs.
I invite you to delve into this process, harnessing these tools to enhance your team’s efficiency. The potential benefits are significant, making this process a worthwhile exploration for those willing to invest the time.
